With all of the Buildathon Contest buzz circulating, we know many of you are actively working to fine tune your site content before clicking that magic “Submit” button. What better quick fix than to utilize buttons of your own?
Today, feast your eyes on a quick lesson from Call-To-Action (CTA) 101: Adding downloadable files to your buttons.
But I don’t have anything for users download.
To start, many of you may be thinking, “What kind of files would I want my audience to download?” Maybe you’re a baker generously linking your audience to printable, step-by-step recipes. You could be a personal trainer with downloadable spreadsheets full of formulas, allowing users to calculate their Body Mass Index. Or even a landlord allowing potential tenants to download and fill out applications. No matter which vertical your business may be placed in, there are several opportunities for you to ease the lives of your users.
Give me the deets.
Upon entering Sitebuilder, drag and drop the Picture widget to the spot you’d like your button to be placed, and proceed in uploading your button.
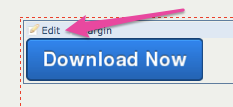
Once uploaded, click the “Edit” button in the top left corner of your picture widget.
Inside the image editor, click “Choose a Link.”

Then click the radio button next to “File stored in this site,” and click “Browse.” You can upload the document of your choice or browse for any existing documents that you previously added.

Once uploaded and selected, click “Okay,” “Save” and your button is finished. Go ahead and publish your site and share your downloadable files with the world!
Ready to try out a few CTAs on your own? Click the button below to download a .zip file full of buttons to try out on your website!
![]()
Want to catch up on a few more 5-minute website fixes?
Keep and eye out for more posts in the 5-minute website fixes series!